Skip to content
To retain its beauty and functionality, your acrylic makeup organizer must be properly kept. The dust, makeup residue, and fingerprints can all build up on the surface as time goes on, which also will reduce its clarity and shine.
Regularly cleaning your acrylic organizer will definitely help you keep the organizer last longer and keep your makeup collection organized and easily accessible.

Cleaning Basic Knowledge
Soap Solution
You can begin with dusting and cleaning the dust on the acrylic makeup organizer. Use a mild soap solution. After cleaning, rinse and blot dry.
Microfiber Cloth
Wipe Down The Organizer: A microfiber cloth or similar soft cloth is best for wiping off the organizer. It also helps keep the acrylic looking clean.
Avoid Harsh Cleaners
Avoid harsh cleaners when cleaning your makeup organizer. Use softer agents instead to keep from wearing down the acrylic.
Recommended Cleaning Methods
Makeup Remover Wipes
Use a makeup remover wipe to correctly clean off any makeup stains in your acrylic makeup organizer. Not only are they convenient and easier on surfaces, but they also accommodate a thorough cleaning without any risk of harm.
If the makeup residue will not come off by rubbing the organizer, you can use a wet towel with a little bit of plain detergent. The wet towel will loosen the makeup, and soap is the detergent made to break down oil and pigment.
Specialty Cleaning Products
After cleaning your acrylic makeup organizer, use a plastic surface polish or a chemical cleaner that is intended for plastic surfaces in order to polish the surface. These specialized products help you put a final touch on it and get the shine back to your organizer.
Pros:
- Convenient and easy to use.
- Gentle on acrylic surfaces.
- Cleans tough stains and messes well.
Cons:
- Heavily stained areas may need to be rewiped several times.
- Specialty items can be pricier than standard detergents.
Special Focus Areas
Pay Attention
Special care must be taken when cleaning the corners and edges of your acrylic makeup organizer. These areas tend to accumulate dirt or grime, for which it is important to clean it thoroughly as it is directly related to hygienic matters.
Thorough Cleaning
You want to make sure you have a perfectly clean inside of the makeup organizer. Then, wipe the inside clean with a mild soapy solution.
Check Hidden Spots
Check for any dirt hidden in places overtime on the organizer. These are often neglected areas but they can hold bacteria and influence the cleanliness of your makeup.

How to Remove Acrylic Makeup Organizer Scratches
Tip: Gently buff the scratches with a mild abrasive cleaner: A paste of baking soda and water. Wash with water and clean with a soft piece of cloth.
Non-gel toothpaste: Take non-gel toothpaste and a clean, soft cloth, and apply to the scratches in small circles to remove them. Clean off any remaining messes and use a damp cloth to wipe up the water before drying thoroughly.
Use a Magic Eraser: Wet a magic eraser sponge and rub the scratches on the acrylic makeup organizer. If you do rinse, please make sure that you have washed off all of the leftover residue and dry the organizer completely.
Plastic polish: To polish acrylic surfaces, please follow the manufacturer’s instructions when doing the plastic polish. This will prevent scratches on the makeup organizer.
Use a scratch remover product: Purchase a quality scratch remover made for acrylic surfaces and read the directions on the package carefully. It could help relieve acrylic and reduce scratches.
Heat gun: If the scratches are shallow, you can choose to use a heat gun on a low setting to soften the acrylic material. While the material is still warm and supple, lightly buff the scratches out with a soft fabric material then let it cool to harden.
Acrylic makeup organizers with deep or widespread scratches may need to be professionally repaired. A professional can assess the damage and suggest the best approach to repairing the organizer's appearance.
How to Clean a Makeup Organizer
Cleaning Makeup Organizer Step-by-Step
- Take out all makeup bottles and supplies from the organizer.
- Clean the organizer using a slightly moistened cloth and dry off potential debris.
- Clean the Organizer with a mild soap or cleaning solution.
- Wash the organizer with water and put the makeup back in the organizer after it dries completely.
- List out your makeup products and throw old or expired items on a list.
- Be sure to use dividers or containers inside the organizer to keep items separated and organized.
- Consider some drawer liners to protect the organizer and help you clean it in the future.
| Features | Pros | Cons |
|---|---|---|
| Easy to clean | Keeps makeup organized | It may require frequent cleaning |
| Helps prevent clutter | Saves time finding products | Limited space for large collections |
| Durable material | Customizable storage options | It may need occasional maintenance |
- Example: Use acrylic dividers for a sleek look.
- Option: Consider using a rotating organizer for easy access to all your makeup.
- Tip: Clean your makeup brushes regularly to prevent buildup in the organizer.
By preventing this build-up, you also prevent the organizer from getting dirty. TIP: Maintain your makeup brushes clean regularly to avoid accumulations in the organizer.
Always scrub off the makeup organizer to not only find products fast but also to keep all your makeup fresh and hygienic.

Maintaining Regularly
Maintenance
If you buy a good acrylic makeup organizer once in your lifetime, regular maintenance should be done to keep it new and increase durability. It is essential to keep it clean on a week-to-week basis to avoid leaving makeup residues behind.
You should also avoid putting heavy objects on the organizer as it can warp or crack. Treat it carefully to last long.
Top 9 Cleaning Tips
- Use Mild Cleaners
Since the material of the acrylic makeup is delicate, it should be cleaned using mild cleaners. Choose a mild soap and water mix.
- Soft Microfiber Cloth
To help avoid surface scratches, always use a soft microfiber cloth when cleaning your acrylic organizer. Do not use rough or abrasive materials.
- Gentle Circular Motions
Use wide circular strokes to gently wipe the organizer to ensure even cleaning without streaks or marks.
- Regular Dusting Routine
Maintaining a regular dusting schedule will help keep your acrylic makeup organizer looking new and fresh around the clock.
- Avoid Harsh Chemicals
Avoid anything too harsh like chemicals with ammonia or alcohol-based products as it can make the acrylic material turn yellow or worse destroy it.
Pros:
- Prevents possible damage to acrylic material.
- Helps prevent any scratching damage.
Cons:
- Needs to be cleaned regularly over chemicals.
- Pat Dry Immediately
Always dry acrylic immediately after cleaning to avoid spotting or streaking.
- Air Dry Thoroughly
Allow your acrylic makeup organizer to air dry completely before you return your cosmetics so they do not get wet from water.
- Store it in a Cool and Dry Place.
Please always store your acrylic organizer in a cool, dry location, away from direct sunlight or heat sources, to preserve its life as long as possible.
- Be Gentle with Handling
Take extra care with your acrylic makeup organizer and do not drop or knock it about to avoid cracks or product breakage.

Maintaining Acrylic Quality
Regular Cleaning
This is very important when considering the high-impact, durable acrylic material your acrylic makeup organizer is made of. Clean the acrylic surface with soapy water.
Gently clean; avoid scratching the clear acrylic makeup organizer. Remember never to use paper towels, microfiber towels, or napkins on any of the acrylic products.
Preventing Damage
Keep the acrylic makeup organizers free from chemicals that may ruin them. The acrylic makeup storage compartments can efficiently store your makeup items.
Always remember to keep knives or abrasive utensils away from clear acrylic makeup organizers. This will help prevent scratches and keep your organizer looking like new.
Proper Maintenance
Proper makeup organization not only keeps your cosmetic products organized but also helps to protect the acrylic makeup organizer itself. Proper maintenance increases the life span of acrylic products by keeping their efficiency steadfast.
Check the acrylic makeup storage for damage on a weekly basis. They should also be promptly addressed to avoid more serious damage to the acrylic surface.

Final Remarks
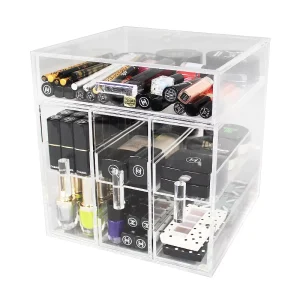
This is how you can clean your acrylic makeup organizer professionally. By simply following the listed approaches and paying attention to certain areas, your shoe organizer can stay looking as good as new, as these photos show.
Dealing with Scratches
When it comes to scratches, curb rash, or any other similar imperfection, make sure you address them as soon as possible and follow this comprehensive cleaning guide. Remembering the best 9 cleaning tips that you can use, you can probably keep your acrylic organizer like it is done by professional house cleaning.
Start looking after your beauty by taking care of your makeup organizer. Cleaning the bathroom can be a chore for some people, but by making these cleaning practices a regular part of your maintenance routine, you can have a clutter-free and sharp-looking organization system for all of your makeup needs. Keep shining bright!